Solving sudoku puzzles is easier than it looks, and all but the very hardest puzzles can be solved using just a few simple techniques. You don't need any maths, and you don't need to guess. It's all done by observation and logic, and the most important thing is to stay 100% accurate at all times.
This page covers techniques that will solve most puzzles up to 'fiendish' or 'very hard' rating. They work for 9X9 and 16X16 sudoku puzzles - there's just more of everything in the bigger version (see 16X16 notes at the end of the page).
The major solving techniques in this page - and more - are covered in my book Mastering Sudoku, along with 52 specially-chosen puzzles to exercise the skills you've learned. Click here for details.
You can also get and solve puzzles online with step-by-step hints and a
13,000+ puzzle database, at
SudokuXP. To try it, visit SudokuXP's free
Puzzles of the Day
page.
Click here
for a printer-friendly version of this page.
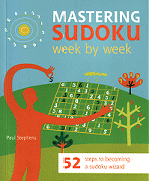
Here's a standard sudoku puzzle. It's a
grid 9 squares wide and 9 squares deep. The lines of squares running
horizontally are called rows, and the lines running vertically are called
columns. The grid is further divided by the darker lines into nine 3 X 3 square
'boxes'.
Some of the squares already have numbers in them. Your task is to fill in the
blank squares. There's only one rule:
-
Each row, column and box must end up containing all of the numbers from 1 to 9.
This rule has an important side-effect, which is the basis of all solving techniques:
-
Each number can only appear once in a row, column or box.
Getting started.
Solving sudoku is all about eliminating the impossible. It's also about looking at the same thing in different ways.
◊ The crosshatching and
slicing/dicing techniques shown in the first part of this page are enough, on
their own, to solve most easy puzzles. If you're new to sudoku, it's worth
generating some easy puzzles and practising these techniques.
To solve more difficult puzzles you need to use crosshatching in combination
with other techniques. These are described in the second part of this page.
 Crosshatching - finding squares for
numbers.
Crosshatching - finding squares for
numbers.
The obvious way to solve a sudoku puzzle is to find the right numbers to go in the squares. However the best way to start is the other way round - finding the right squares to hold the numbers.
This uses a technique called 'crosshatching', which only takes a couple of minutes to learn. It can solve many 'easy' rated puzzles on its own.
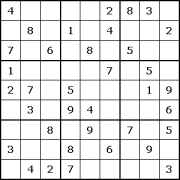
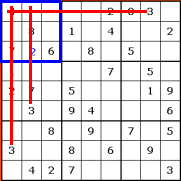
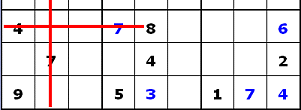
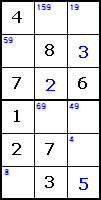
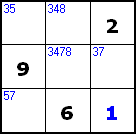
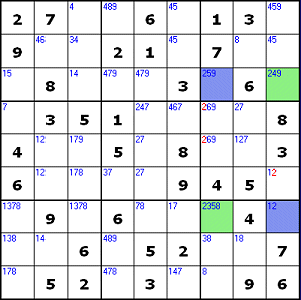
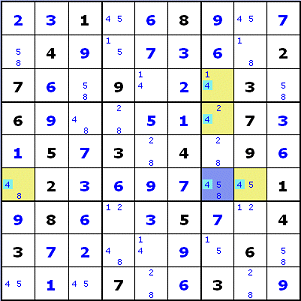
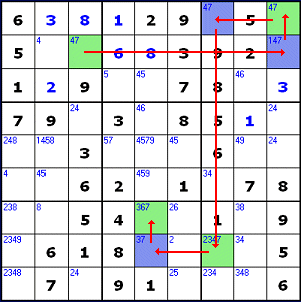
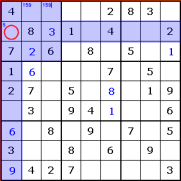
Crosshatching works in boxes (the 3 X 3 square subdivisions of the grid). Look at the top-left box of our sample puzzle (outlined in blue). It has five empty squares. All the numbers from 1 to 9 must appear in the box, so the missing numbers are 1,2,3,5 and 9.
We'll ignore 1 for a moment (because it doesn't provided a good example!), and see if we can work out which square the missing 2 will go into.
To do this, we'll use the fact that a number can only appear once in any row or column. We start by looking across the rows that run through this box, to see if any of them already contain a 2. Here's the result:
Bingo! The first two rows already contain 2s, which means that squares in those rows can't possibly contain the 2 for this box. That's all we need to know, because the third row only has one empty square, so that must be the home for the 2.
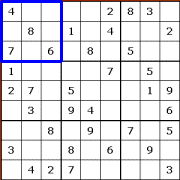
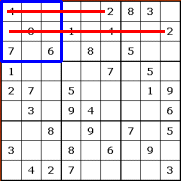
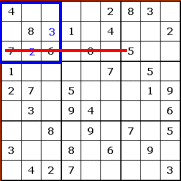
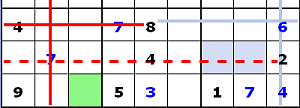
Now let's see if we can place the 3 for this box. This time we end up checking the columns that run down through the box, as well as the rows that run across it:
Again, we get a result first time - there's only one empty square that the 3 can possibly go into. You can see from this example why it's called 'crosshatching' - the lines from rows and columns outside the square criss-cross each other.
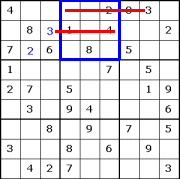
Of course you don't always get a result first time. Here's what happens when we try to place the 5:
There's only one 5 already in the rows and columns that run through this box. That leaves three empty squares as possible homes for the 5. For the time being, this box's 5 (and its 1 and 9) have to remain unsolved.
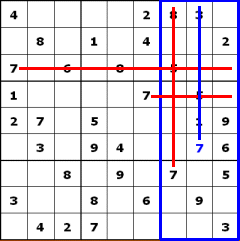
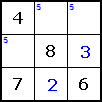
Now we move on to the next box:
Here we're crosshatching for 3, the first missing number in this box. Note how we treat the 3 we placed in the first box as if it had been pre-printed on the puzzle. We still can't place this box's 3 though, so we'll move on to the next missing number (5), and so on.
◊ In sudoku, accuracy is essential. If the 3 in the first box is wrong, we'll be starting a chain of errors that may prove impossible to unravel. Only place a number when you can prove, logically, that it belongs there. Never guess, and never follow hunches!
An important factor in crosshatching (and sudoku in general) is that the more numbers you place, the more likely you are to place others - including ones you couldn't place earlier.
Placing numbers in the second box may well make it possible to go back and place missing numbers in the first. It's good to get into the habit of looking backwards as well as forwards, re-checking whether the numbers you've just placed have made numbers placeable elsewhere in the puzzle.
◊ In SudokuXP you can use the crosshatching mouse tool to automatically crosshatch boxes on screen. See Mouse Help for details.
Free Gifts - instantly-solvable squares.
As soon as you start filling squares, start looking out for 'free gifts' - areas (rows, columns and boxes) which only have one empty square left.
Here's an example:

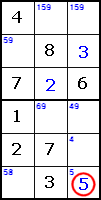
This row has one empty square, and one missing number (3). That must be the right number for the square, so we can solve it straight away. (Tip - if there's more than one missing number, you've put another number in twice. Now's a good time to double-check for that!).
To find the missing number, just count from 1 to 9, mentally ticking each number off if you see it in the area - as soon as you reach a number that isn't there, that's the answer. You'll soon stop having to do this though, and instead develop the knack of 'seeing' which numbers are missing from areas without having to count through.
It's easy to miss free gifts when you're concentrating on other solving techniques (and remember - they happen in columns and boxes, as well as rows). It's worth getting into the habit of noticing them though, especially when you're crosshatching, because the more squares you fill the easier crosshatching becomes.
Grouphatching
(Slicing and dicing)
In sudoku it pays to look at the same thing in different ways. By using crosshatching slightly differently, you can often get quicker results.
Instead of looking at a single box and its missing numbers, you can look at a group of three boxes running across or down the puzzle, trying to place each number from 1 to 9 in as many of the boxes as you can.
In this example we're trying to place 7s in the three right-hand boxes:
The stack of boxes starts out with just one 7 in place (bottom box). This solves the middle box's 7 (entered in blue), and entering that immediately solves the top box's 7 as well.
This 'chain reaction' of solving wouldn't occur in single-box crosshatching. It happens here because we're focussing on a single number across multiple boxes - looking at things differently.
Crosshatching and grouphatching are basically the same thing, but grouphatching can be more efficient, and often feels less laborious than doggedly working through the empty squares in a single box (although that's what you will have to do in order to solve tough puzzles, so be prepared!).
You can also try 'Superhatching' - trying to place each number in all nine boxes before moving on to the next number.
Virtual crosshatches are described fully
in my book Mastering Sudoku. They use
the idea of number claiming (see box claims, below) to
create a crosshatching line even though there isn't a number in the relevant row
or column yet. This, in turn, lets you successfully crosshatch boxes for numbers
that otherwise wouldn't produce a result.
In this example, the left-hand box is being crosshatched for 8. This leaves three possible squares, so the 8 can't be placed.
Now look at the right-hand box. It doesn't crosshatch successfully for 8 either, but both of its possible squares line up in a single row. We know that there will be an 8 in one of those squares, and therefore that there can't be an 8 anywhere else in that row. This lets us draw a 'virtual crosshatch' line from the right-hand box along the row. With this line in place, the left-hand box successfully crosshatches for 8.
The right start...
It's a good idea to start any puzzle by slicing and dicing, perhaps switching to single-box crosshatching if you get stuck. Don't forget to look out for free gifts, as they make the solving process much easier!
Almost all 'easy' puzzles can be solved that way - just make a first pass through the whole puzzle placing all the numbers you can, then go back and start again, seeing if any more numbers can now be placed. Keep doing that, and eventually you'll fill the whole puzzle. If you use virtual crosshatching, you'll be able to solve many 'moderate' puzzles too.
In practice you'll soon find that you stop working in passes through the whole puzzle, and begin darting to whichever area looks most likely to have solvable squares.
If you get stuck (i.e. you can't place any more numbers), then it's worth making another methodical pass through the whole puzzle. This will often reveal a solvable square you've missed.
... but when the going gets tough...
On tough puzzles crosshatching, grouphatching and even virtual crosshatching will eventually run out of steam - you'll make a pass through the whole puzzle without being able to place any more numbers.
When this happens it's time to switch to a different approach, using the solving techniques described in the second part of this page.
The first step, however, is more crosshatching. This time you need to go through the entire puzzle, box by box, crosshatching each box for all its missing numbers. As you do that, you make a note of which squares each missing number can possibly go into. This is called 'pencilling in'.
Pencilling in.
The solving techniques needed for more difficult puzzles all depend on having an accurate list of the possible numbers (called 'candidates') for each empty square. You can build this list by pencilling the candidates in as you make a complete crosshatching pass through the puzzle.
Looking at the top-left box of our original puzzle, crosshatching produced three possible squares where the missing 5 could go. Here's the box, with 5 'pencilled-in' to the corners of its three possible squares:
◊ (It's called 'pencilling-in' because on a printed puzzle many people use a pencil, so that they can rub numbers out later (an essential part of the solving process). In SudokuXP you can click in the top-left corner of the square, then type and delete numbers like a normal text box)
1 and 9 were also unsolved for this box. Here's the box with all its missing numbers pencilled into their possible squares:
This list must be complete and accurate, otherwise you risk creating another chain of errors. That's why it's essential to crosshatch every missing number for every box before starting the next stage of solving.
Candidate lists must also be kept up to date (the reasons for this will become obvious later). Here's what it means:
On the left is is the top-left box, and the one below it. We've just entered a 5 in the bottom-right square of the lower box.
Now we remove that square's candidate list. We also remove 5 from
the candidate list at the top of the same column, and the left of the same row.
Here's how the boxes look afterwards:
Whenever you fill in a square, remove the number you've used from all candidate
lists in the same row, column and box. Here are the areas we needed to check for
candidate 5s after filling in this square:
Don't worry if that looks complex - in practice it's quick and easy to scan through the same row, column and box as the square you've just filled.
When you're crosshatching the puzzle, remember to update any candidate lists that are affected by numbers you place.
Serious Solving!
It's always worth starting the solving process with a quick slice/dice, because it might solve a square or two even on the toughest puzzle.
However if the puzzle is rated 'hard' or tougher, crosshatching techniques will soon stop producing results. It's best to cut your losses, do the full pencilling-in crosshatch, and move on to some serious solving.
◊ In difficult puzzles with 26 or fewer starting squares, the initial crosshatching run will produce few solved squares, and long lists of candidates. Don't be put off by this - the lists will soon start to shorten as you apply the rules described below.
This part of the solving process is where you switch approach and start finding numbers for squares instead of squares for numbers. You do this by checking your pencilled-in candidate lists for a series of rules (or 'candidate patterns'), and acting on them.
There are lots of rules (and more being discovered all the time), but a basic set of five will solve most puzzles up to 'really tough' or 'fiendish' level. It's worth practicing these until you find yourself recognising the patterns instinctively (it doesn't take long), then adding more rules to your repertoire as they're needed.
Always remember that all rules depend on your candidate lists being complete, accurate and up to date. Get them wrong and you'll soon have big problems!
The first two rules let you solve squares immediately.
When a square has just one candidate, that number goes into the square.
Here's the mid-left box again, as it was before we entered the 5:
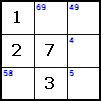
The mid-right and bottom-right squares each have only one candidate, so we can put those numbers into the squares.
Some squares will be single-candidate from the start of the puzzle. Most, however, will start with multiple candidates and gradually reduce down to single-candidate status.
This will happen as you remove numbers that you've placed in other squares in the same row, column and box, and as you apply candidate elimination rules described below.
When a candidate number appears just once in an area (row, column or box), that number goes into the square.
Look at the mid-left box again:
The number 6 only appears in one square's candidate list within this box (top-middle). This must, therefore, be the right place for the 6.
Get ready to eliminate!
Crosshatching, slicing and dicing and the two rules described above are the only ways you can solve (fill) a square in sudoku.
All the other rules are candidate elimination rules - they let you eliminate candidates from pencilled-in lists, reducing the lists down towards meeting rule 1 or 2.
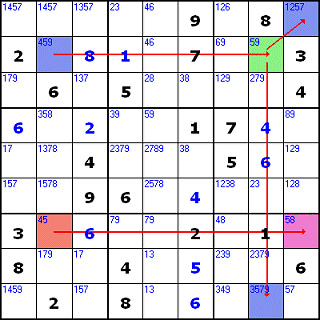
When two squares in the same area (row, column or box) have identical two-number candidate lists, you can remove both numbers from other candidate lists in that area.
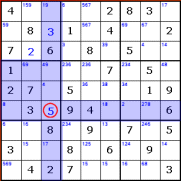
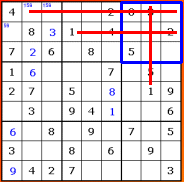
Here's the second row of the puzzle:
![]()
Two of the squares have the same candidate list - 67. They don't have any other candidates, so one of them will have to take the 6 and the other the 7. We don't know which way round it will be, but either way they'll use up the 6 and 7 for this row.
That means that the other empty square in this row can't possibly contain a 6. We can safely remove the 6 from its candidate list, leaving just 9 - square solved!
Triples are a three-square, three-candidate version of pairs.
Three squares in an area (row, column or box) form a triple when they contain a total of exactly three different candidate numbers. You can remove numbers that appear in the triple from other candidate lists in the same area.
We've described the triple rule differently from pairs ('a total of exactly three different candidate numbers..' rather than 'identical three-number lists'). This is because squares in a triple often don't contain all three of the triple's candidates.
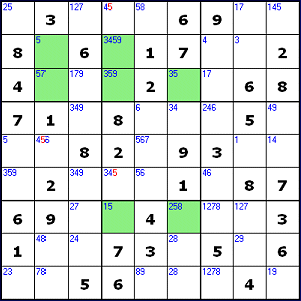
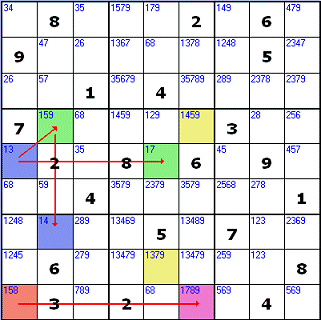
Here's an example of a triple:

The three green squares have candidate lists of 48, 28 and 248. Between them, they contain a total of exactly three different candidate numbers - 2, 4 and 8 - so they form a triple. Two of the squares don't contain all three candidates, but whichever way you work it out, the triple's three squares will still use up the 2, 4 and 8 for this row. Those candidates can therefore be eliminated from other squares in the row (in this example, 2 and 4 can be eliminated from the fifth square).
Squares in a triple with less than three candidates are called 'subset' squares, and most of the triples you'll find will contain at least one of them.
Rather than counting numbers of different candidates, it can be easier to think in terms of lists - compile a list of all the candidate numbers that are present in a group of three squares (the 'full list'), and if that list if three candidates long, it's a triple.
A good place to start is a square with three candidates - that's a full list for a triple, so look for two other squares in the same area that contain only candidates that are already in that list (i.e. are full- or sub- sets of it). In the example above, with 248 (eighth square) as the full list, 48 and 28 are obviously subsets, so those three squares form a triple.
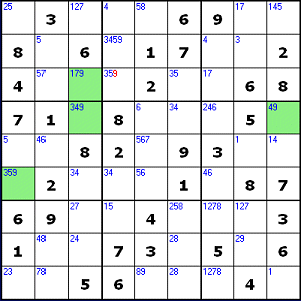
With practice, it can be surprisingly easy to spot a three-candidate full list even when none of the squares have all three candidates. Here's an example:
Three of the squares in this box have candidate lists of 35, 37 and 57 - all subsets of the full list 357. These squares form a triple on 357, and those candidates can be eliminated from other squares in this box.
If you find more than three squares in an area that contain only candidates from a three-candidate list, then you've gone wrong somewhere! In the box above, the squares in the middle column each contain candidates (4 and 8) that aren't in the 357 list.
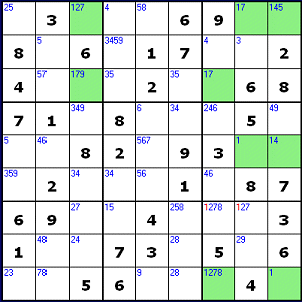
A triple can, of course, include two or all three squares with the full three-candidate list - these are the obvious ones, and you should have no difficulty spotting them! Here's an example:
![]()
 Beyond triples - The general rule of
disjoint subsets.
Beyond triples - The general rule of
disjoint subsets.
Pairs and triples are examples of a general rule called 'disjoint subsets'. We can express the rule like this:
A set of N squares in an
area (row, column or box) forms a disjoint subset group when they contain a
total of exactly N different candidate numbers. Those candidates can be
eliminated from other squares in the area.
![]() Like all
disjoint subset patterns, pairs (N=2) can include subset squares, but they tend
not to get used because a subset of a two-candidate list is a
single candidate square, and thus immediately solvable.
Like all
disjoint subset patterns, pairs (N=2) can include subset squares, but they tend
not to get used because a subset of a two-candidate list is a
single candidate square, and thus immediately solvable.
A single-candidate square can, however, function perfectly well as a member of a pair or triple. This normally has the same effect as solving the single-candidate square then updating its surrounding candidate lists, but can be quicker.
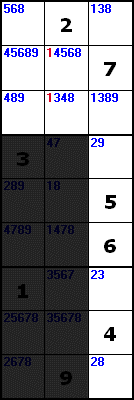
On the left is an example. The top three unsolved squares, with candidates of 26, 23 and 2, form a triple (N=3) with a full list of 236.
That lets us remove the 3 and 6 from the bottom square's candidate list, reducing it to just 8 - square solved!
You'll sometimes see 'quadruplets' (N=4) - four squares all with full or sub sets of a four-candidate list. However in 9X9 puzzles they tend to be redundant, i.e. there aren't any other squares in the area that have candidates from the quad's list waiting to be eliminated. This is also true of pairs and triples in the later stages of difficult puzzles, when all the possible eliminations have been made. A puzzle that's filled with redundant pairs, triples and quads is said to be 'gridlocked'.
These patterns are sometimes referred to as 'exposed' or 'naked' pairs, triples
etc, because the squares contain only the candidates from the full list (so
those candidates are exposed to view). This distinguishes them from hidden pairs
and triples (see below).
Disjoint subsets are examples of 'N=N' rules, solving techniques based on N squares or areas coinciding with N different candidates, or occurrences of particular candidates. We'll see the N=N idea at work later in hidden pairs and triples, and in advanced patterns such as X-Wings and Swordfish.
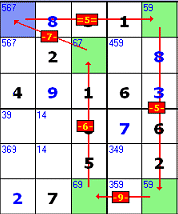
When a candidate number only appears in one row or column of a box, the box 'claims' that number within the entire row or column.
Here's a box:
The number 1 only appears as a candidate in the top row of the box. This means there will have to be a 1 somewhere in the first three squares of the puzzle's first row (i.e. the part of the row that overlaps the box). That in turn means that 1 can't go anywhere else in that row, outside of this box.
You can read across the row, and remove 1 from any candidate lists outside of this box, even though you haven't actually placed 1 yet.
![]()
In this example, we can remove the 1 from the right-hand square's candidate list. This makes the square single-candidate (7) - square solved!
Box claims are the basis for virtual crosshatches, described earlier. Here we're crosshatching the top-right box for 1:
We can rule out the top row, because the top-left box has already claimed that row's 1. This lets us place the 1 in the bottom-right square of the box.
Box claims work the same way in columns - if all occurrences of a particular candidate number within a box lie in a single column, that candidate can be eliminated from other squares in that column.
If all occurrences of a candidate within a row or column fall inside the same box, then other occurrences of that candidate can be removed from that box.
This rule is the reverse of Box Claims - instead of the box claiming the number within the row/column, the row/column claims the number within the box.
In the right-hand column of this example, all the occurrences of candidate 1 are in the top box.
This means that the 1 for this box must go in that column, so we can remove 1s from other candidate lists in that box.
And, er, that's it (possibly!)...
Using crosshatching plus complete, up-to-date candidate lists and the rules described above, you can solve a surprisingly large percentage of the 'hard', 'fiendish' and even 'diabolical' puzzles printed in magazines and newspapers. It's just a matter of scanning through the puzzle, looking for the claim, single-square candidate or triple that will unlock the next stage of the solution.
The harder the puzzle, the harder they tend to be to find, and the fewer 'easy' pairs and single-candidate squares present themselves. But the hard-to-spot rules are in there somewhere - you've just got to find them!
The keys to successful solving are:
-
Total accuracy - never put a number in a square or candidate list unless you're absolutely sure it's right.
-
Completeness - make sure to crosshatch every missing number in every box, so that you start the second stage of solving with complete candidate lists.
-
Maintenance - whenever you place a number in a square, update all the candidate lists in the same row, column and box, straight away (this includes numbers placed during crosshatching).
Extreme puzzles.
If the rules described above won't solve a puzzle, then there are two possibilities:
-
It's a genuinely extreme, but solvable, puzzle, which requires extra rules to solve.
-
It's not a genuine sudoku puzzle, because it either:
a. Has more than one possible solution, requiring you to make guesses in order to find one of them.
b. Doesn't have a solution at all.
◊ To check whether a puzzle has more than one solution, type or import it into sudoku@paulspages or SudokuXP. In sudoku@paulspages, click 'Check my answer' to see if the puzzle is single-solution. SudokuXP will tell you automatically.
If either page gives the puzzle a rating other than 'outlaw', then it's guaranteed to be solvable by logic alone, with no guesses required. SudokuXP has a more powerful puzzle analyzer than sudoku@paulspages, so will find logic-based solutions to more puzzles.
Assuming the puzzle is genuine, a good place to start is with the next set of solving rules (yes, there are more rules!). Here they are:
When a set of N squares contain all occurrences of a set of N candidates within an area (row, column or box), other candidates can be removed from those squares.
These patterns are a variation on the exposed pairs, triples and quads we've already seen. Instead of the squares containing only the candidates in the list, they contain the only occurrences of the list's candidates in the area. Instead of eliminating the list's candidates from other squares, other candidates (those not in the list) are eliminated from the pattern's squares.
Here's an example of a hidden triple (N=3):
![]()
The triple comprises squares 1, 2 and 5. All three include the candidates 4, 5 and 7 (three different candidate numbers), and those candidates don't appear anywhere else in this row.
Whichever way you work it out, these three squares will end up containing the 4, 5 and 7 for this row. That means they can't possibly hold any numbers other than 4, 5 or 7.
This lets us remove the other candidate numbers from these squares, like this:
![]()
This turns square 6 (18) into the only square with candidate 1, thus solving the square. (Incidentally, there's another way to solve square 6 in this row - can you spot it?).
A hidden pair (N=2) is, of course, two squares containing the only occurrences of two different candidates in an area. Hidden quads (N=4) do exist, but are hardly ever found.
Like all N=N rules, this one works with subsets. For example, if the row looked like this:
![]()
Square 2's list doesn't contain a 5, but squares 1,2 and 5 still contain, between them, the only occurrences of candidates 4, 5 and 7 for this row, so form a hidden triple.
Hidden pairs and triples (especially those with subset squares) are much more difficult to spot than the exposed versions. They also don't occur anything like as often, so don't waste too much time looking for them.
The important thing when looking for hidden patterns is to make sure none of the candidates appear anywhere else in the area.
If the puzzle still won't budge, and you're confident that it's valid, then you'll need to enter the exotic world of chains, Fishy patterns, Nishio and Nice Loops.
When a remote pair chain (below) exists, the chain's candidates can be eliminated from any square outside the chain that's related to a blue and a green chain square.
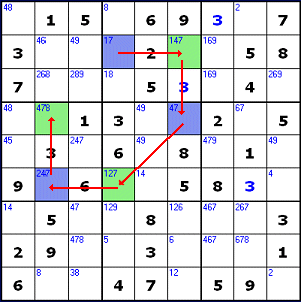
Remote pair chains are a simple extension of the basic pair pattern, in which the second square in a pair is also the first square of a pair in another area, and so on. Here's an example:
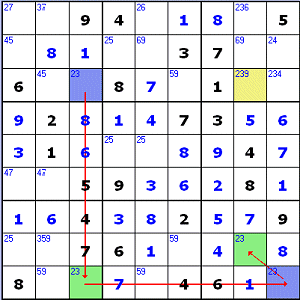
The blue and green squares in column 3 form a pair on candidates 23. The second of them (row 9 column 3) is also half of a pair on 23 in row 9, and row 9 column 9 is, in turn, half of a pair on 23 in the bottom-right box. These four squares form a chain of pairs on candidates 23, as shown by the arrows.
We can make some deductions about the
possible values of the chain's squares.
If row 3 col 3 (blue) is 2, then:
row 9 col 3 (green) must be 3, so
row 9 col 9 (blue) must be 2, so
row 8 col 8 (green) must be 3.
If row 3 col 3 (blue) is 3, then:
row 9 col 3 (green) must be 2, so
row 9 col 9 (blue) must be 3, so
row 8 col 8 (green) must be 2.
These deductions cover all the possible solutions to these squares - there aren't any others, because the squares don't have any other candidates.
Now for the important bit - we can say for certain that when the puzzle is
solved all the blue squares will contain one of the chain's candidate values (2
or 3), and all the green squares will contain the other.
This means that any square that's related to a blue and a green square (e.g. the yellow one at row 3 column 8) can have both of the chain's candidates removed, because the blue square will definitely end up containing one of them, and the green square the other.
Same logic, stretched out...
The solving logic we use in pair chains is the same as in a basic pair (two
squares in the same area with the same two candidates), but 'stretched out'
along a linked chain of squares.
This gives pair chains a very important characteristic - they're 'gridlock breakers'. In their later stages, difficult puzzles often fill up with redundant single-area patterns, such as basic pairs and triples (a pattern is redundant when you've already eliminated all the candidates it could potentially affect). By crossing area boundaries, pair chains create a new level of solving logic, which breaks the single-area gridlock.
In the above example, the yellow square (239) is part of a redundant quad (2369) in its column, and redundant quintuplets in its row (23459) and box (23469). Individually, those three areas have nothing more to give in solving terms, but by creating a chain that links together squares in two of them (the yellow square's row and column), we can attack the square from two directions, and prove that it can never contain two of its current candidates.
Pair chains are the simplest example of 'inference chain' patterns, where
putting a value in the first square lets you draw inferences (deductions) about
what the values would be in all the other squares along the chain. Inference
chains are the main gridlock-breakers in Sudoku - other types include conjugate
pair chains, forcing patterns and Nice Loops.
There's no such thing as a remote triple (or quad) chain, because in such a
pattern putting a value in the first square wouldn't allow you to say for
certain what the value in the second and subsequent squares would be.
X-Wings,
Swordfish & Jellyfish ("Fishy Exclusions")
When N rows contain occurrences of a particular candidate in a total of N columns, other occurrences of that candidate can be eliminated from those columns.
Similarly, when N columns contain occurrences of a candidate in a total of N rows, other occurrences of that candidate can be eliminated from those rows.
Thanks to their exotic-sounding names, the fishy patterns are probably the most famous of the extreme solving techniques. They're also not as hard to understand as they might seem.
If you've read the sections on pairs, triples etc above, you'll probably recognise this as another variation on the the N=N theme of disjoint subsets. In fishy patterns the two Ns are the number of rows and the total number of columns in which a particular candidate appears in those rows (or the other way round).
Here's an X-Wing (N=2):
In the third and seventh rows, candidate 2 occurs in a total of exactly two
columns (columns 7 and 9). If row 3 column 7 is 2 then row 7 column 7 can't be,
so row 7 column 9 will have to be, and vice-versa. Whichever way you work it
out, the 2s for columns 7 and 9 will go somewhere in the four highlighted
squares, so candidate 2 can be eliminated from all other squares in those
columns.
This pattern is called a 'row-based X-Wing in the 2s'.
Like all N=N patterns, fishy ones can include subsets, in this case rows that contain less than the full N occurrences of the candidate.
Here's a Swordfish (N=3):
There are three (=N) rows, and the occurrences of candidate 5 in these rows line up in a total of three (=N) columns. It doesn't matter that two of the rows are subsets, with only two occurrences of candidate 5 - the pattern is still a valid 'row-based Swordfish in the 5s'. Other occurrences of candidate 5 (shown in red) can be removed from all three columns.
Most Swordfish and Jellyfish (N=4) include at least one subset row, which makes them that bit harder to spot.
Fishy patterns work the other way round, with N columns containing occurrences of a candidate in a total or N rows, allowing the candidate to be eliminated from other squares in those rows. These patterns can be harder to spot. Here's an example:
This is a Swordfish in the 9s, but it's based on columns, not rows (at first glance it may look as if it might be rows, but Row 3 Column 4 shows that it can't be).
Between them, these three columns claim the 9s for rows 3, 4 & 6. Other occurrences of candidate 9 can be eliminated from these rows. In fact we only get one elimination - but in a really tough puzzle that can be worth its weight in gold.
A Jellyfish is the N=4 version of the fishy pattern (four rows or columns, with a particular candidate occurring in a total of exactly four squares). Here's an example:
This is a row-based Jellyfish in the 1s. Other occurrences of candidate 1 can be eliminated from the columns.
BUG
(Bivalue Universal Grave) Removal
When a potential BUG pattern (see below) exists, the BUG-killer square can be solved with the candidate which occurs exactly three times in each area (row, column and box) to which the BUG-killer square belongs.
Like non-unique rectangles, the BUG Removal technique depends on the assumption that the puzzle has just one solution. BUG Removal patterns are rare, but they're easy to spot, and it's easy to tell when one is likely to exist. BUG Removal can make the final stages of difficult puzzles much easier, so it's worth watching out for them.
Remember that you're aiming to prevent a BUG pattern from emerging, not finding one that already exists. So you need to look for a pattern that is almost a BUG.
A BUG pattern is one in which:
-
Every unsolved square in the puzzle has exactly two candidates (i.e. is 'bivalue').
-
In every row, column and box, each candidate value that is present occurs exactly twice.
If a BUG pattern exists in a puzzle, it means that the puzzle either has more than one solution (because you could use up all the available candidates in more than one way), or none at all.
A valid, single-solution puzzle can't possibly contain a BUG pattern, so if you see one about to develop, you can assume that any solving step (e.g. candidate elimination) that would result in the BUG pattern existing is wrong.
This might sound vague (and hard to spot) but in fact it's easy. You're looking for a situation in which all the empty squares in the puzzle have been reduced to two-candidate status, except for one square, which has three candidates. .
Here's an example of what to look for:
In this puzzle all the unsolved squares except one contain exactly two candidates. The other square (R6C7, marked blue) contains three candidates. This is the BUG-killer square, and it's what you need to look out for.
One of the BUG-killer square's candidates (4) occurs exactly three times in each area (row, column, box) to which the square belongs. This is the 'non-BUG candidate', the one that can prevent the BUG pattern from developing.
(TIP - when counting candidate occurrences, don't forget to include the one in the BUG-killer square itself!).
Now for the important bit:
You need to check that this really is a potential BUG pattern.
To do this, imagine the BUG-killer square with the non-BUG candidate removed. Would it now be true that in every row, column and box, each candidate value appears exactly twice?
(For an example of an area in which each candidate value occurs twice, see row 8 in the puzzle above. It has candidates 1, 4, 5 and 8, and each of these appears in two candidate lists in that row.)
If this check proves true, then removing the non-BUG candidate would create a BUG pattern. Removing the non-BUG candidate is therefore impossible, which is another way of saying that the square must be solved with that value. In this example, the blue square can be solved with 4.
Here's what the example puzzle would have looked like if we'd eliminated candidate 4 from the BUG-killer square:
Every unsolved square has exactly two candidates, and in each area (row, column or box), each candidate value occurs exactly twice. It's a BUG!
BUG removal is an 'optional' technique - whenever a BUG removal pattern exists, an alternative solving step can be found using a Forcing Pattern. However the BUG removal pattern is likely to be much easier to spot and use than the alternative forcing loop or chain.
BUG Removal is also very productive - in the example above, not only is the blue square solved, but the four yellow squares are too, because they're left single-candidate by the blue square's solution. Finding a BUG rather than a forcing pattern can provide a leap forward towards the end of a puzzle.
The type of BUG removal described here is technically knows as 'BUG+1 Removal', because just one square has three candidates. There's also a 'BUG+2' pattern (two squares with three candidates), and a 'BUG Lite' version where a potential BUG pattern exists in only some of the puzzle's unsolved squares. These versions are more complex, and often less productive, than BUG+1. See Sudopedia for more details.
◊ To find out if a puzzle has just one solution, type or paste it into Sudoku@paulspages or SudokuXP. The program will tell you whether the puzzle has zero, one or more than one solution. This check is 100% accurate - if the program says a puzzle has just one solution, then it does.
Conjugate
pair chains (simple colouring)
When a conjugate pair chain (see below) exists:
-
The chain's candidate can be eliminated from any square that's related to a blue and a green square.
-
If two or more squares of the same colour appear in the same area (row, column or box), then that must be the wrong colour, and all squares of the other colour can be solved with the chain's candidate.
Conjugate pair chains are another example of inference chain (see remote pair chains, above). Although the name sounds complicated, they're a fairly simple idea. They're hard to spot (at first, anyway), but the payoff can be worth it, as they can solve multiple squares in one move.
Step 1 - the conjugate pair.
A conjugate pair exists when a candidate (for example 7) occurs in exactly
two squares within an area (row, column or box). Here's an example, in the
second row of a puzzle:

Just two squares in the row contain candidate 7. These squares form a conjugate pair. We can observe a couple of things about them:
-
One of these two squares must contain the 7 for this row.
-
If the first square doesn't contain the 7, the second one must, and vice-versa.
The squares in a conjugate pair always contain other candidates besides the pair candidate (unless one of them is a single-candidate square, and thus solvable its own right). That's what makes them hard to spot!
So far so good, but we don't know which of the two squares the 7 will go into, so we can't actually solve anything. Let's take things a step further.
 Step 2 - the conjugate chain.
On the right is a bit more of the puzzle. As it turns out, the second square
of the row's conjugate pair (147) is also the first square of a conjugate pair
in its column, also for candidate 7. Now we have the start of a chain of
conjugate pairs.
Each square in a sudoku puzzle is a member of three areas - a row, a column and a box. A conjugate chain exists where a member of a conjugate pair in one area is also a member of a conjugate pair for the same candidate in one (or both) of its other areas.
Very important - when linking two conjugate pairs into a chain, the candidate numbers must be the same for each pair. If the two squares in the column had formed a pair on candidate 4 instead of 7, that would not have made a chain.
Now the observation gets a bit more interesting:
-
If the first square (17) doesn't contain 7, then the second (147) does, and because the second does, the third (47) doesn't.
-
If the first square (17) does contain 7, then the second (147) doesn't, and because the second doesn't, the third (47) does.
This alternating does-doesn't-does (or true-false-true) rule extends all along the chain, however long it gets. Here's the puzzle with the chain fully built:
(Thanks to Brian Kaszynski for pointing out
an earlier error in this chain's construction)
As you can see, we've coloured the squares of the chain, to illustrate the alternating pattern (I first saw this colouring technique on Angus Johnson's excellent sudoku site). You'll often see this technique (conjugate pair chains with coloured squares) referred to as 'simple colouring'.
Starting from the first square (17-blue) we can see true-false-true alternating through 147-green, 47-blue, 127-green and 247-blue to 478-green. Alternatively we might have built the chain as 17,127,247 and 478, then separately as 147,47 - a chain can grow from both ends.
The colours help us to make two crucial observations about conjugate pair chains:
-
Either all the blue squares will contain 7, or all the green squares will contain 7. There can't be a mix of the two.
-
Any square which is related to (in the same row, column or box as) a blue square and a green square can't contain the chain's candidate, since ether the blue or the green square will end up being solved with that value.
There's an example of the second point in the puzzle above - the eighth square of the fourth row. It's related to the blue and green squares in that row, so can have candidate 7 removed, leaving it solvable as 6.
Even if it doesn't produce any immediate candidate eliminations, a conjugate pair chain is still a multi-square solving bonanza waiting to happen. If, by some other means, we solve one of the squares in the chain (or just eliminate its candidate 7), then we've solved half of the entire chain:
-
If we solve a green square as 7, then green is the right colour and all green squares can be solved as 7.
-
If we solve a green square as something other than 7, then green must be the 'wrong' colour, and all blue squares can be solved as 7.
-
If we eliminate 7 from the candidate list of a green square, then green is the wrong colour (because the square will eventually be solved as something other than 7), and all blue squares can be solved as 7.
And vice-versa from blue to green.
On that basis it's worth looking out for conjugate pair chains, and colouring them in so that you can quickly solve half the chain if you get a break from elsewhere.
◊ In SudokuXP, you can colour squares using the mouse. Click 'Mouse' next to 'Data Entry', then click 'Blue' or 'Green'. Clicking on a square will set it to your chosen colour. Clicking on the square again will remove the colour. For more information on using mouse controls, see the Mouse Help page.
Self-solving chains
Sometimes the chain itself can tell you which colour is right. Here's an example:
Again the puzzle contains a conjugate pair chain for candidate 7. However there's something different about this chain - two of its blue squares are in the same box (top-right). This provides the solution.
If blue was the right colour, then both squares would have to contain 7 - and that can't happen because they're in the same box. So blue must be the wrong colour, and green the right one. We can solve all four green squares with 7, in a single move!
This kind of 'can't happen' logic is called an inconsistency, and occurs when we take an apparently viable proposition and prove that it would lead to an impossible ('inconsistent') result.
In this example what we're actually saying is 'if row 2 column 3 isn't 7, then row 2 column 9 must be, so row 1 column 9 can't be, and row 1 column 7 must be'. This would result in two squares in the top-right box being 7, which is impossible. This means that it's impossible for row 2 column 3 not to be 7 (i.e. it must be 7!). Since we now know that this square must be 7, we can prove, by following the chain, that all the other green squares must be 7 too.
Is it guesswork?
Inconsistencies are used to provide solving proof in many chain patterns, including Forcing Chains and their more general form, Discontinuous Nice Loops. Some people say that because such techniques are based on an initial 'what-if?' proposition ('what if row 2 column 3 isn't 7?'), they amount to trial and error (which is considered very bad form in sudoku circles!). In fact they're no more trial-and-error than a basic pair, in which the logical argument is 'if square A contains candidate X, then square B must contain candidate Y and vice-versa'.
All sudoku solving techniques are based on what-if? logical analysis (even a simple crosshatch is based on 'if we put X in here there'd be two Xs in this row, so we can't'). Another characteristic they share is that no actual solving is performed (i.e. no squares filled or candidates eliminated) until the result of the what-if? proposition has been established. In real trial-and-error you guess a square's value, then go on solving other squares until you find a dead end which proves that the guess was wrong (by which time it's normally too late to find your way back). That's something quite different from controlled, non-destructive what-if analysis.
Keep building the chain!
We could have stopped building the example chain above after its fourth square, when blue had proved itself the wrong colour, but by going on we found two more green squares that could be solved immediately. Adding squares to a chain is easy - just check the last square's other two areas (for example, column and box if the link from the previous square is along a row) to see if there's another conjugate pair on the same candidate - so it's worth going the 'extra mile' (or square!).
And if, instead of finding one long
productive chain, you find two (or more) short, unconnected chains on the same
candidate, don't throw them away - they could be just what you need for
Multi-colouring (see next section)!
A multi-colouring pattern consists of two separate conjugate pair chains on the same candidate.
A Type 1 multi-colouring pattern exists when squares of one colour are related to squares of both the other chain's colours. The colour which is not cross-chain related is proved true. All of that colour's squares can be solved with the chains' candidate.
A Type 2 multi-colouring pattern exists when square(s) of one colour are related to square(s) of just one of the other chain's colours. The chains' candidate can be eliminated from any square outside the chains which is related to both of the other two (non cross-related) colours.
Multi-colouring is a more advanced version of simple colouring (see above). It
uses two conjugate pair chains on the same candidate, and can be surprisingly
easy to spot, partly because in this context a 'chain' often consists of just
two squares (i.e. a single conjugate pair).
To use multi-colouring, first you have to find two conjugate pair chains on the same candidate. The most important thing to remember (and the most easily-made mistake!) is that the chains must be separate, i.e. they must not link up to form a single conjugate pair chain. To provide solving proof, some squares must be related across the two chains ('cross-chain'), and it's essential that these relationships don't, in fact, make the two chains into one (see below for a way to check this).
Type 1 multi-colouring.
Here's an example of a Type 1 multi-colouring pattern:
The puzzle contains two separate conjugate pair chains on candidate 5. One of the chains is coloured blue and green, while the other is coloured red and purple.
Now look at the blue squares. One of them is related to a red square (column 2), while another is related to a purple square (column 9). Remember that the rule of conjugate pair chains is that one of a chain's colours is 'right' (i.e. all squares of that colour will eventually be solved with the chain's candidate), while the other colour is 'wrong'.
This means that blue can't possibly be right, since if all the blue squares were solved with 5, neither the red nor the purple square could be 5 (and one of them must be, because they're a conjugate pair). Blue must, therefore, be the wrong colour for its chain, and green must be the right one. All green squares (just one of them in this example) can be solved with the chains' candidate (5).
In some Type 1 patterns a single square is related to two differently-coloured squares in the other chain. In others (like this example), two (or more) squares of a single colour are related to a total of two colours in the other chain. Either way is fine. In multi-colouring it's the number of colours that counts, not the number of squares. In this example, what matters is that one colour in one chain is related to both colours in the other chain.
Here's the way (mentioned above) to check that the chains are genuinely separate. Look at each pair of cross-related squares (e.g. blue-red, blue-purple) and make sure that there is at least one other occurrence of the chains' candidate in the area that relates them. This means the two squares aren't a conjugate pair, so don't make the two chains into one.
In the above example the chains' candidate is 5. In column 2 (blue-red) there are three other occurrences of 5, while in column 9 (blue-purple) there's one, so everything's OK.
Type 2 multi-colouring.
Type 2 multi-colouring patterns are slightly more complex than Type 1s, but occur much more often, so are worth understanding. Here's an example of a Type 2 multi-colouring pattern:
The two conjugate pair chains are on candidate 1, and again they're coloured blue/green and red/purple.
This time there's just one cross-chain colour relationship - a red square (row 9 column 1) is related to blue squares. Remember - in multi-colouring it's the number of colours, not the number of squares, that counts, so it doesn't matter how many red and blue squares are related to each other. What matters is that just one colour in one chain (red) is related to just one colour (blue) in the other chain. In this example there are no cross-chain relationships involving green or purple squares.
The red-blue cross-chain relationship means that red and blue can't both be right (because they can't both contain 1). At least one of the other two colours (green and purple) must, therefore, be right, since both chains must end up with a right colour.
The chains' candidate (1) can be eliminated from any square outside the chains which is related to a green and a purple square, since one of those colours must end up being right. These squares are shown yellow in the example above.
As with Type 1 patterns, it's essential to be sure that the chains aren't joined into a single conjugate pair chain. Red is cross-related to blue in column 1 and box 7 (bottom-left ). Both areas contain additional occurrences of candidate 1, so that's OK.
Multi-colouring may look a bit daunting at first, but finding one of these patterns can often avoid the need to find much longer and more complex forcing patterns later (see below).
Further Extreme
Solving Techniques
SudokuXP supports five further extreme solving techniques (see below). These are fully described in my book Mastering Sudoku. If you don't have a copy, here are some links to other guides which describe them:
You'll also find brief descriptions of these techniques in SudokuXP's Hint windows. To see puzzles which require these techniques, use SudokuXP's Advanced Puzzle Finder feature (click "Get A Puzzle" then choose "Advanced Puzzle Finder" from the pop-up menu).
Meanwhile SudokuXP supports another extreme technique, which comes close to being sudoku's 'theory of everything' - Nice Loops. For details, read on!
Nice Loops
 Nice
Loops are the nearest thing Sudoku has to a 'theory of everything' - a universal
solving technique that can find most (and often all) of the candidate
eliminations needed to complete a hard or extreme puzzle.
Nice
Loops are the nearest thing Sudoku has to a 'theory of everything' - a universal
solving technique that can find most (and often all) of the candidate
eliminations needed to complete a hard or extreme puzzle.
In practice it's normally quicker and easier to find patterns such as pairs, triples and X-Wings, but there are some cases where a Nice Loop is the only (or easiest) way to find the next step in the solution. It's very easy to go wrong when building a Nice Loop though, so you've got to be extremely careful.
Nice Loops are covered in a separate section of this guide - click here to view it.
Finding examples of advanced patterns
Perhaps surprisingly, it's easy to find real-life examples of advanced patterns such as hidden triples, X-Wings and Swordfish - almost all 'easy' rated puzzles have at least some of them at the beginning.
You don't need to find advanced patterns to solve easy puzzles, because simpler techniques, such as crosshatching, will do the job. Nevertheless, finding them can be good practice for solving extreme puzzles, when only a Swordfish or conjugate chain will break the deadlock.
◊ In SudokuXP, you can tell the solver/hint system to find advanced patterns in easy puzzles.
Normally, the system tries simple solving techniques (such as crosshatching) first. Easy puzzles can be solved using just these techniques. This shows you the easiest way of solving the puzzle, but you don't get to see any advanced patterns.
However you can tell the system to look for advanced patterns first instead. This will reveal hidden pairs, conjugate chains, X-Wings etc in most easy puzzles, so you can practice recognising them.
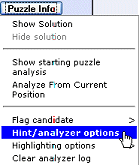 To do this, choose 'Hint/Analyzer
options' from the 'Puzzle Info' button menu. This opens the options panel:
To do this, choose 'Hint/Analyzer
options' from the 'Puzzle Info' button menu. This opens the options panel:
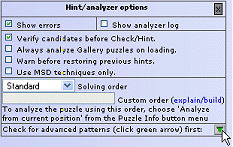
Now click on the green arrow to open the advanced patterns table:
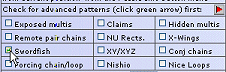
Check the type(s) of patterns you want to find. When you press the Hint or Solve button, the solver will look for these patterns before checking for crosshatches and single-candidate squares.
TIP - don't forget to uncheck these items if you want to go back to simple-techniques-first solving!
SudokuXP also has a new Advanced Puzzle Finder (click "Get A Puzzle" then choose it from the pop-up menu):
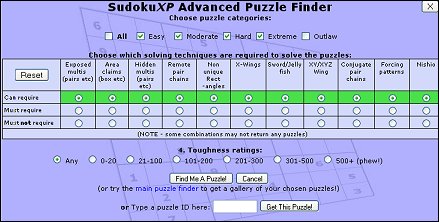
This lets you specify which advanced techniques are (and aren't) required to solve the puzzle. Between them, the puzzles in the SudokuXP Gallery contain examples of all the solving techniques described here.
It's worth remembering that spotting advanced patterns is only essential in a small minority of genuinely extreme puzzles.
Guessing is, in fact, one of the quickest and simplest ways to solve a sudoku puzzle - if you're a computer. If you're not, then it's best avoided if at all possible.
Guessing should only be used near the end of a puzzle, when there are 12 or fewer squares left to solve (and preferably 6 or fewer). Any earlier, and it's more likely that either the puzzle is invalid, or you've missed something.
If the puzzle is printed and you've got a photocopier, make a copy (including your solution so far) and work on that. In SudokuXP, press 'Save Bookmark' (or export the puzzle as text, copy it to the clipboard and save it via a text editor).
Now find a square with just two candidates (any more and you're asking for trouble!). Choose one of the candidates and pencil it into the square.
The first thing to do is check whether your guess has made the puzzle unsolvable (a 'dead end'). Update all the candidate lists in the same row, column and box, plus any others that are affected as a result (for example, because a pair or triple has now emerged). Then check the whole puzzle for the following:
- A row, column or box from which a number is still missing, but
which now doesn't have that number in any of its candidate lists.
- A triple which has now become three identical two-candidate
squares.
- A square which is empty, but now has no candidates.
If any of these occur, then your guess was wrong. Restore your puzzle to its previous state (scrap your copy or press 'restore bookmark'), then try the other candidate as your guess - it should be correct (if it's not, then you've got bigger problems!).
Unfortunately the fact that a guess isn't immediately proved wrong doesn't necessarily mean that it's right - sometimes the dead end will only become apparent after you've taken more steps in the solving process. You'll have to go on solving, keeping an eye out for the signs that the puzzle has now become unsolvable.
This is why guessing is best kept to the last stages of the puzzle, where the pathway to either a solution or a dead end is relatively short.
Extra tips - checking that everything's still correct.
Sometimes you might suspect that errors have crept into your candidate lists. One way to check is to re-crosshatch the box where you think the error is, crosshatching for all its missing numbers.
There is, however, another way to check how many candidates a square has. Just read through the row, column and box it belongs to, crossing off all the numbers that appear in them (including any claimed numbers, as long as you're completely sure of them). The numbers that don't appear are that square's candidates.
Here's the whole puzzle, with the row, column and box relevant to the square at row 2, column 1 highlighted:
Check off the numbers that already appear in these areas, and you'll find the list reads 1,2,3,4,6,7,8,9 - only 5 is missing.
This technique (like crosshatching) will only restore the starting value of a candidates list, not any reductions you'd found by applying the rules described above.
Errors in candidate lists are relatively easy to deal with. Errors in placed numbers are much more dangerous, because they can corrupt all the candidate-list calculations around them. Always double (or triple) check that a number is right before placing it as a square's value. If you want to avoid serious headaches, never guess!
Quick Solving Checklist
Here's a quick checklist of the solving plan for tough puzzles.
1. Try grouphatching to solve any easy squares. Don't spend too long on it though.
2. Crosshatch the entire puzzle box-by-box, pencilling-in complete candidate lists.
3. Scan the puzzle for the following rules:
-
Single-candidate squares - solve immediately
-
Single-square candidates within an area (row/column/box) - solve immediately.
-
Claims by a box - remove the claimed candidate from the same row/column in other boxes.
-
Pairs within an area - remove the pair squares' candidates from other lists within that area.
-
Triples within an area - remove the triple candidates from others lists within that area.
4. Whenever you solve a square, immediately check and update all candidate lists in the same row, column and box.
5. Whenever you've updated a candidate list, check to see if one of the rules now applies (e.g. you've created a triple, or a box is now claiming a number).
6. Never guess! (Unless you're absolutely sure you have to!)
Solving 16X16 puzzles
Solving 16X16 puzzles is very much like solving 9X9s - there's just more of everything.
The first thing to remember is that you're working with 16 values, not 9. In SudokuXP16 the standard symbols are 0123456789ABCDEF (which will be familiar to programmers as the hexadecimal digits), so get used to using 0, and looking out for missing A's to Fs.
Crosshatching and slicing/dicing work the same way as in 9X9, the difference being that four rows and columns runs through each box, and there are 16 values to crosshatch for. In SudokuXP16 you can use the Crosshatching mouse control (see Mouse Help for details) to do the work for you, as in this crosshatch for 0 on the top-left box:
Candidate lists are compiled and maintained in the same way too. Lists will be longer, particularly at the start of the puzzle (so keep crosshatching to get them down in size!).

All the candidate analysis techniques described earlier in this page work in the same way on 16X16 puzzles. The quantities don't change - a single-candidate square is still one with just one candidate, and a single-square candidate appears only once in a row, column or box. They're not as rare as you might imagine, either, even at the start of the puzzle, with single-square candidates seeming to be more common than in 9X9.
The disjoint subsets rule is the same, so a pair (N=2) is still two squares whose candidate lists contain only members of the same two-value set (e.g. '5C').

Not surprisingly, quads (N=4) are more common than in 9X9.
In 16X16 it's really worth sharpening up your subset-spotting skills (e.g. triples where some of the squares have two or even one candidate), because these occur more often and are even more valuable than in 9X9 (you need all the help you can get!). Here's a subset triple - spot the odd square out!
Excluded candidates (rule 6), box line reduction (rule 7), conjugate chains (rule 8) and X-Wings/Swordfish/Jellyfish (rule 9) all work the same way as in 9X9.
Have fun!
Paul Stephens, January 2007.
© Paul Stephens, 2005-7. All rights
reserved.
Cookie Policy